Mostrando entradas con la etiqueta Photoshop. Mostrar todas las entradas
Mostrando entradas con la etiqueta Photoshop. Mostrar todas las entradas
martes, 18 de septiembre de 2012
How To Design A Casino Website Layout
How To Design A Casino Website Layout: In this Photoshop tutorial, you are going to learn to create a website graphics about games subject, as poker or basically Casino’s activities. This is an actual design with all what you need. This design is really incredible, are you ready to start it ? Be sure you get enough time, because this tutorial is ...Continue Reading

Acción vintage para Photoshop
Acción vintage para Photoshop:

The post Acción vintage para Photoshop appeared first on Creativos Online.
Como todos sabéis, porque lo he comentado por aquí en más de un artículo, me encantan los colores del estilo vintage…la decoración vintage ya no me gusta tanto y hoy mientras navegaba me he encontrado esta acción vintage para Photoshop que logra un efecto vintage en las fotografías que me ha encantado así que aquí os lo traigo.
Esta acción ha sido creada y compartida por lieveheersbeestje en su perfil de DeviantArt y podéis descargarlo para usarlo en vuestros diseños. En la página que os enlace al final de este artículo podéis descargarlo y leer las condiciones de uso que pone su autor, entre ellas pide que no se redistribuya esta acción cambiándole el nombre y atribuyéndosela a otros.
Espero que le saquéis mucho partido a esta acción y consigáis fotografías tan bonitas como las que podéis ver en los ejemplos de la fotografía que encabeza este artículo.
Fuente | Acción vintage para Photoshop
Vestido de salpicaduras con Photoshop
Vestido de salpicaduras con Photoshop: Hola! Espero que os guste este nuevo tutorial en el que aprenderemos a crear un efecto de salpicaduras en la ropa. También puede aplicarse a piel, flores o cualquier elemento que queráis. Espero que os guste! Besos! ;D


How To Create Your Own Judge Dredd Badge Design
How To Create Your Own Judge Dredd Badge Design:
One of the biggest movies at the moment is the Judge Dredd remake, which is obviously the inspiration for this tutorial. Follow this step by step guide to create yourself an awesome judge’s badge design with Adobe illustrator and Photoshop. We’ll create the basic artwork in Illustrator before moving over to Photoshop for colouring and texturing.

This is the Judge Dredd badge we’ll be creating, inspired by the 2012 movie design. The various pieces are constructed using Illustrator’s pen and pathfinder tools, then Photoshop is used to texture the badge to give a distressed metal appearance.
View the final Judge Dredd badge design

We’ll need a reference photo to base our design on. There’s plenty of random photos you can steal from a quick Google Images search of “Judge Dredd badge”. Paste the photo into Illustrator, reduce the opacity then lock it into place with the shortcut CMD+2. Draw a polygon and move the points into place with the Direct Selection tool.

The lower edge of the badge is curved, so use the Pen tool to add an extra point and stretch out its bezier handles to match the reference photo.

To keep everything symmetrical, delete one side of the side then copy/paste the remaining half. Go to Object > Transform > Reflect to flip it, then join the two open points together with the shortcut CMD+J. Pro Tip: Toggle Smart Guides to make alignment easy (CMD+U).

Select the complete badge outline and go to Object > Path > Offset Path. Enter around -6mm to create a parallel inner line matching the reference photo.

Repeat the process a few more times to create a series of concentric lines.

Use the pen tool to trace the outline of the eagle head from the reference photo. Give this element a white fill to mask the intersecting lines. Use those Smart Guides to snap the path exactly to the badge outline.

Select all the uppermost points of the concentric shapes and extend them well beyond the edges of the main badge outline.

Copy (CMD+C) and Paste in Front (CMD+F) a duplicate of the badge outline, then select this and the first concentric shape and trim it to size by hitting the Intersect button from the Pathfinder palette. Paste in another copy of the badge outline and repeat the process with the next shape.

Begin filling out the inner details of the badge with simple shapes. Keeping those Smart Guides active will make it easy to line everything up.

Overlap two duplicates of the innermost concentric shape and ‘Subtract’ one from the other with the Pathfinder to create an arrowhead style shape to match the reference photo.

Make a copy of the arrowhead shape and nudge it upwards to create a gap between it and the rectangles, then use it with the pathfinder to trim each of the small rectangles to size. Remember to copy the shape before performing the first pathfinder command, as you’ll need to paste a copy back in ready for the next procedure.

Draw and rotate a rectangle to match the angle of the centre strip of of the badge. Overlap any diagonal lines you’ve already drawn to make sure all the angles are exactly the same.

Make a copy of the rectangle then use it as a tool along with the Pathfinder Subtract option to trim all the elements and split the badge in two.

The outer edge needs trimming in order to create the relevant shape, but that leaves a gap in the outline. Copy and Paste in Front a duplicate of the outline so a trimmed version can sit on top of the original.

Now all the pieces are in separate halves you can select and remove any lines that aren’t required.

Use the pen tool to trace the shapes on the bottom edge of the badge design. Make sure to extend the top and bottom edges so they can be trimmed exactly to size.

Make a copy of the arrowhead shape and use this to punch out the excess from each shape with the Pathfinder Subtract option.

Repeat the process of trimming down the shapes, but this time use a copy of the badge outline and use the Intersect option. In order to select the outline it will need to be Ungrouped. The recent Pathfinder command will have paired it with another element.

Copy and paste the series of shapes and Reflect them so they sit perfectly on the opposite side.

Draw a selection around all the elements that make up the badge and give them a white fill. Some objects might disappear, to correct this adjust the stacking order of elements with the shortcuts CMD=[ and CMD+]. Toggle outline mode (CMD+Y) to check for any hidden shapes.

To give the design a more natural shape, remove those sharp edges by adding 1mm of Round Corners from the Effect > Stylize menu.

Type out your name to fit into the centre strip. Here I’m using the font ONRAMP. Give the text a Shear effect to match the angle of the badge.

Go to Object > Expand and select just the Object option to convert the text to outlines. Swap the black fill for a white fill and black stroke to match the rest of the artwork.

The linework and basic design of our Judge Dredd badge is now complete, but let’s bring it to life with some colour and texture. For that we switch over to Photoshop!

Paste a copy of your Illustrator linework into Photoshop and scale it to size in a suitable document.

Use the Magic Wand tool to select a shape, then fill this area on a new layer.

Open up the Layer Style options for this layer and give it a gradient overlay using a mix of goldish tones. Alternate between colours to achieve a shiny effect.

Add a Drop Shadow to the shape using black, Linear Burn and size of around 35px.

Add an Inner Glow effect with a light yellow, Overlay and 13px size to add more highlighting tones.

Finally add a thin 2px stroke effect with the stroke fill set to gradient and using the same colour mix as the main overlay.

CMD+Click the layer to load its selection then fill a new layer with grey. Go to Filter > Noise > Add Noise and increase the amount to fill the area with heavy grain.

Next, go to Filter > Blur > Motion Blur and adjust the angle to vertical. Increase the distance to create a brushed metal effect.

Load the selection of the original shape again, then inverse this selection and remove the excess from the brush effect layer. Change this layer to Color Burn to allow the brushed metal effect to interact with the colours of the layer below.

Repeat this process for all the individual elements that make up the badge. Choosing to do this separately is quite time consuming, but it keeps every shape unique so the gradients and textures don’t continue across multiple areas.

The layer styles can be copied and pasted from one layer to the next, but don’t forget to adjust the angle of the gradient to avoid any uniform effects.

Once all the gold areas are filled, select the remaining areas that represent the background of the badge and fill these with a darker grey-brown.

Give these darker areas an Inner Shadow effect using black, Multiply and a size of around 20px.

Download a concrete texture file and paste it into the document. Use the selection of the darker areas to trim the texture to size.

Change this texture layer to Color Burn to allow the detailed texture to interact with the flat brown-grey colour.

Load the selection of all the gold elements and fill a new layer with grey. Add a subtle amount of grain using the Noise filter and change this layer to Color Burn at 40%.

Open up a rust texture and place it over the design. Trim it down to size using the same selection then desaturate it and change its blending mode to Soft Light.

These quick additions of texture really help bring the badge to life with distressed grimy metal effects that interact with the colours and highlights from the layer styles.
This leaves our super cool Judge Dredd inspired badge design complete. Go forth and serve some justice!
Download the source file
One of the biggest movies at the moment is the Judge Dredd remake, which is obviously the inspiration for this tutorial. Follow this step by step guide to create yourself an awesome judge’s badge design with Adobe illustrator and Photoshop. We’ll create the basic artwork in Illustrator before moving over to Photoshop for colouring and texturing.
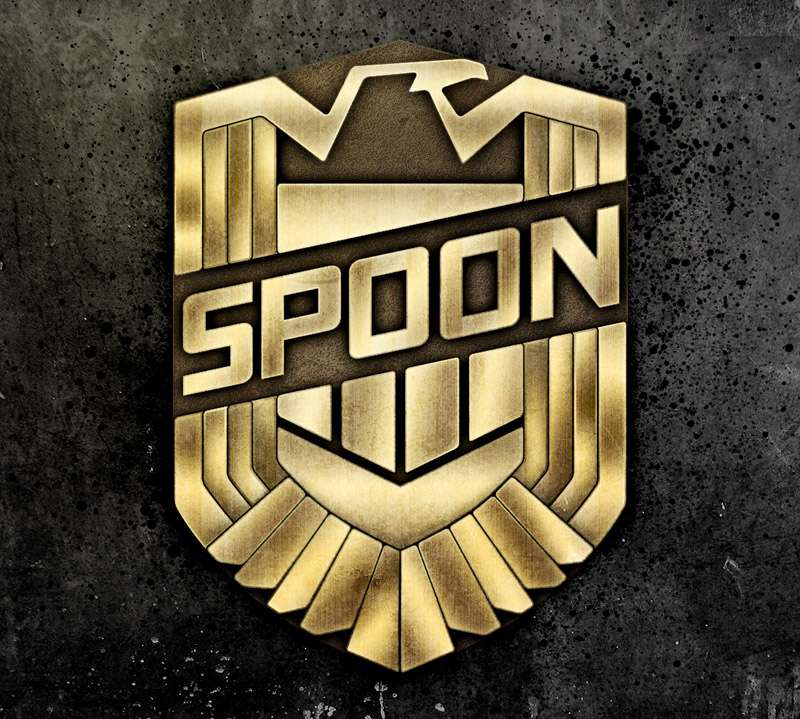
This is the Judge Dredd badge we’ll be creating, inspired by the 2012 movie design. The various pieces are constructed using Illustrator’s pen and pathfinder tools, then Photoshop is used to texture the badge to give a distressed metal appearance.
View the final Judge Dredd badge design
We’ll need a reference photo to base our design on. There’s plenty of random photos you can steal from a quick Google Images search of “Judge Dredd badge”. Paste the photo into Illustrator, reduce the opacity then lock it into place with the shortcut CMD+2. Draw a polygon and move the points into place with the Direct Selection tool.
The lower edge of the badge is curved, so use the Pen tool to add an extra point and stretch out its bezier handles to match the reference photo.
To keep everything symmetrical, delete one side of the side then copy/paste the remaining half. Go to Object > Transform > Reflect to flip it, then join the two open points together with the shortcut CMD+J. Pro Tip: Toggle Smart Guides to make alignment easy (CMD+U).
Select the complete badge outline and go to Object > Path > Offset Path. Enter around -6mm to create a parallel inner line matching the reference photo.
Repeat the process a few more times to create a series of concentric lines.
Use the pen tool to trace the outline of the eagle head from the reference photo. Give this element a white fill to mask the intersecting lines. Use those Smart Guides to snap the path exactly to the badge outline.
Select all the uppermost points of the concentric shapes and extend them well beyond the edges of the main badge outline.
Copy (CMD+C) and Paste in Front (CMD+F) a duplicate of the badge outline, then select this and the first concentric shape and trim it to size by hitting the Intersect button from the Pathfinder palette. Paste in another copy of the badge outline and repeat the process with the next shape.
Begin filling out the inner details of the badge with simple shapes. Keeping those Smart Guides active will make it easy to line everything up.
Overlap two duplicates of the innermost concentric shape and ‘Subtract’ one from the other with the Pathfinder to create an arrowhead style shape to match the reference photo.
Make a copy of the arrowhead shape and nudge it upwards to create a gap between it and the rectangles, then use it with the pathfinder to trim each of the small rectangles to size. Remember to copy the shape before performing the first pathfinder command, as you’ll need to paste a copy back in ready for the next procedure.
Draw and rotate a rectangle to match the angle of the centre strip of of the badge. Overlap any diagonal lines you’ve already drawn to make sure all the angles are exactly the same.
Make a copy of the rectangle then use it as a tool along with the Pathfinder Subtract option to trim all the elements and split the badge in two.
The outer edge needs trimming in order to create the relevant shape, but that leaves a gap in the outline. Copy and Paste in Front a duplicate of the outline so a trimmed version can sit on top of the original.
Now all the pieces are in separate halves you can select and remove any lines that aren’t required.
Use the pen tool to trace the shapes on the bottom edge of the badge design. Make sure to extend the top and bottom edges so they can be trimmed exactly to size.
Make a copy of the arrowhead shape and use this to punch out the excess from each shape with the Pathfinder Subtract option.
Repeat the process of trimming down the shapes, but this time use a copy of the badge outline and use the Intersect option. In order to select the outline it will need to be Ungrouped. The recent Pathfinder command will have paired it with another element.
Copy and paste the series of shapes and Reflect them so they sit perfectly on the opposite side.
Draw a selection around all the elements that make up the badge and give them a white fill. Some objects might disappear, to correct this adjust the stacking order of elements with the shortcuts CMD=[ and CMD+]. Toggle outline mode (CMD+Y) to check for any hidden shapes.
To give the design a more natural shape, remove those sharp edges by adding 1mm of Round Corners from the Effect > Stylize menu.
Type out your name to fit into the centre strip. Here I’m using the font ONRAMP. Give the text a Shear effect to match the angle of the badge.
Go to Object > Expand and select just the Object option to convert the text to outlines. Swap the black fill for a white fill and black stroke to match the rest of the artwork.
The linework and basic design of our Judge Dredd badge is now complete, but let’s bring it to life with some colour and texture. For that we switch over to Photoshop!
Paste a copy of your Illustrator linework into Photoshop and scale it to size in a suitable document.
Use the Magic Wand tool to select a shape, then fill this area on a new layer.
Open up the Layer Style options for this layer and give it a gradient overlay using a mix of goldish tones. Alternate between colours to achieve a shiny effect.
Add a Drop Shadow to the shape using black, Linear Burn and size of around 35px.
Add an Inner Glow effect with a light yellow, Overlay and 13px size to add more highlighting tones.
Finally add a thin 2px stroke effect with the stroke fill set to gradient and using the same colour mix as the main overlay.
CMD+Click the layer to load its selection then fill a new layer with grey. Go to Filter > Noise > Add Noise and increase the amount to fill the area with heavy grain.
Next, go to Filter > Blur > Motion Blur and adjust the angle to vertical. Increase the distance to create a brushed metal effect.
Load the selection of the original shape again, then inverse this selection and remove the excess from the brush effect layer. Change this layer to Color Burn to allow the brushed metal effect to interact with the colours of the layer below.
Repeat this process for all the individual elements that make up the badge. Choosing to do this separately is quite time consuming, but it keeps every shape unique so the gradients and textures don’t continue across multiple areas.
The layer styles can be copied and pasted from one layer to the next, but don’t forget to adjust the angle of the gradient to avoid any uniform effects.
Once all the gold areas are filled, select the remaining areas that represent the background of the badge and fill these with a darker grey-brown.
Give these darker areas an Inner Shadow effect using black, Multiply and a size of around 20px.
Download a concrete texture file and paste it into the document. Use the selection of the darker areas to trim the texture to size.
Change this texture layer to Color Burn to allow the detailed texture to interact with the flat brown-grey colour.
Load the selection of all the gold elements and fill a new layer with grey. Add a subtle amount of grain using the Noise filter and change this layer to Color Burn at 40%.
Open up a rust texture and place it over the design. Trim it down to size using the same selection then desaturate it and change its blending mode to Soft Light.
These quick additions of texture really help bring the badge to life with distressed grimy metal effects that interact with the colours and highlights from the layer styles.
This leaves our super cool Judge Dredd inspired badge design complete. Go forth and serve some justice!
Download the source file
36 Brand New Freebie PSDs Released by Dribbble Members
36 Brand New Freebie PSDs Released by Dribbble Members:

Dribbble has quickly grown into the most amazing community for design inspiration. Members are constantly posting up shots for user interfaces, icons, and even full website layouts! Many times you’ll also notice these shots have an attached .PSD or .AI file free to download. This freedom of sharing open source graphics has really helped the worldwide community of designers.
In this gallery I’ve put together some of the newest Dribbble freebies published over this past summer in 2012. Members are always excited to share their latest works, and designers are just as excited to play around with their PSD files! This is especially beneficial to new designers who are still learning the ropes to proper Photoshop design etiquette. Feel free to go through our collection and download as many files as you need! You can also share any thoughts or questions with us in the post discussion area below.


Dribbble has quickly grown into the most amazing community for design inspiration. Members are constantly posting up shots for user interfaces, icons, and even full website layouts! Many times you’ll also notice these shots have an attached .PSD or .AI file free to download. This freedom of sharing open source graphics has really helped the worldwide community of designers.
In this gallery I’ve put together some of the newest Dribbble freebies published over this past summer in 2012. Members are always excited to share their latest works, and designers are just as excited to play around with their PSD files! This is especially beneficial to new designers who are still learning the ropes to proper Photoshop design etiquette. Feel free to go through our collection and download as many files as you need! You can also share any thoughts or questions with us in the post discussion area below.
User Login Freebie
Login or Register
Resources from GoSquared
Dribbble Box Icon
Speaker + PSD
Cotton Candy UI
Just Another Form
PSD Share Buttons
YouTube for iPhone
GTalk Concept
Switch Control PSD
Corporate Website
Minui Kit
Loading Circles
Upload in the Cloud
Share Buttons
iPhone PSD Template
Progress Steps
Sign Up with Facebook
Modal Box PSD
Code Editor for OSX
Flyer PSD
World’s Cheapest Camera
Merit Badges
Dribbble Activity
Short E-mail PSD
Edit Boxes
Preview Video Player
Dark UI Music Player
Invite Button
Windows Notification UI
Retro Music Player
Ribbon Labels
Rocker Switch
Spotify Login
Search Box
Suscribirse a:
Entradas (Atom)